Main Courses
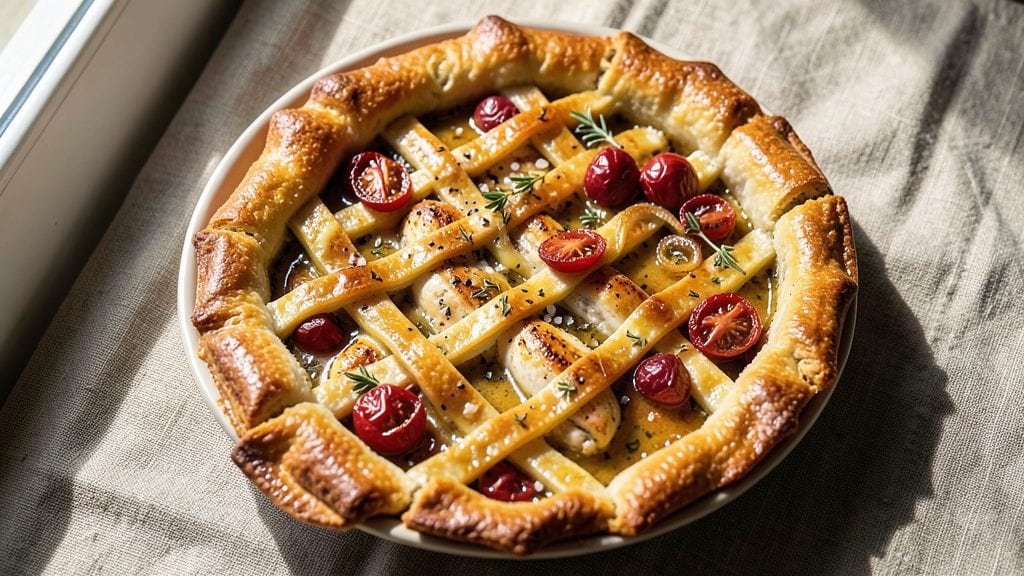
Creating a flaky Bisquick pot pie crust that doesn’t require rolling or fussing is the secret weapon for weeknight dinners that taste like you spent hours in the kitchen.
The beauty of Bisquick lies in its simplicity—just mix, press, and bake to achieve layers that rival homemade pie dough, but in a fraction of the time. I’ve perfected this method after testing countless variations, and the results are consistently golden, tender, and foolproof.
What sets this recipe apart is the quick assembly—no chilling, no rolling, no stress.
You’ll mix the crust ingredients in minutes, press them into a pie dish, fill with your choice of savory filling (whether it’s classic chicken and vegetables or a hearty vegetarian mix), and bake until bubbly and golden.
The crust stays crisp along the edges while remaining tender underneath, creating the perfect vessel for your filling.
The filling is where you can get creative, but the crust remains the star. Whether you’re using leftover roasted chicken, tender green beans, or a mix of root vegetables, the Bisquick crust will hold it all together without overpowering the flavors.
This recipe delivers restaurant-quality results in under an hour, making it ideal for busy families or anyone craving comfort food without the effort.
Once baked, the pie emerges with a golden, shimmering crust that’s effortlessly flaky, while the filling inside is rich and aromatic. Serve it warm with a side of crusty bread to soak up every last drop of sauce. Ready to transform simple ingredients into a showstopping meal? Let’s get started.
Ingredients for bisquick pot pie crust
Mix these simple ingredients for a crust that's flaky, golden, and ready in minutes.
| Ingredient | Amount | Notes |
|---|---|---|
| Bisquick Original Mix 🍞 | 1 ½ cups | Standard, not low-fat version |
| Unsalted Butter 🧈 | ¾ cup | Cold, cubed for better texture |
| Ice Water 💧 | ½ cup | Cold, not tap water |
| Large Egg 🥚 | 1 whole | Room temperature preferred |
| Salt 🧂 | ½ tsp | Kosher or sea salt |
| Black Pepper 🌶️ | ¼ tsp | Freshly ground preferred |
| Garlic Powder 🧄 | ½ tsp | For subtle flavor boost |
| Dried Thyme 🌿 | ¼ tsp | Or 1 tsp fresh thyme leaves |
| Vegetable Oil 🫒 | 1 tbsp | For greasing pie dish |
| All-Purpose Flour 🌾 | 2 tbsp | For dusting work surface |
| Chicken or Vegetable Broth 🍲 | 1 ½ cups | For pie filling base |
| Frozen Mixed Vegetables 🥕 | 2 cups | Peas, carrots, corn preferred |
| Cooked Chicken Breast 🍗 | 1 ½ cups | Diced, leftover works great |
| Heavy Cream 🥛 | ½ cup | Full-fat for richness |
| Sharp Cheddar Cheese 🧀 | ½ cup | Shredded, optional topping |
Bisquick is the star here, but the butter makes all the difference. Use cold butter cubes—never melted or softened. I grab the Land O'Lakes unsalted butter from the grocery store's dairy section, but any brand works. The cold butter creates those flaky layers when it melts in the oven. For the water, ice water is key—it keeps the dough from getting too warm too fast. If you're in a hurry, just use cold water from the tap and let it sit in the freezer for 10 minutes. The egg binds everything together, so make sure it's at room temperature for the best texture. Pro tip: If your kitchen's cold, let the egg sit in warm water for a minute before using.
No Bisquick? Substitute 1.5 cups all-purpose flour plus 2 tbsp melted butter, but the crust won't be as flaky. Short on butter? Use 0.25 cup olive oil instead, though the flavor will be slightly different. The thyme is optional but adds a nice depth—dried works fine, but fresh is better if you've got it. For the filling, frozen veggies are perfect (no chopping!), but fresh will work too. Just make sure they're fully cooked before adding to the pie. The chicken can be any cooked poultry—turkey or even shredded rotisserie chicken works great. And if you're making a vegetarian version, swap the chicken for extra veggies or tofu.
This crust is designed to be made ahead—just keep the dough wrapped in plastic in the fridge for up to 24 hours. The filling can be prepped a day ahead and stored in the fridge. When you're ready to bake, just assemble and pop it in the oven. The pie keeps well in the fridge for 3-4 days, and it reheats beautifully. For leftovers, I like to portion out single servings and freeze them—just microwave for 2 minutes and you've got a quick lunch. The crust stays crispy even after reheating, so don't worry about it getting soggy.
Why You'll Love This Recipe
- No Pantry Stress: I keep a box of Bisquick in my cabinet just for this—no measuring spices, no sifting flour, just dump and mix. The butter cuts in fast, the egg binds it perfectly, and honestly? That first golden crust pull is worth the 10 minutes it takes.
- Crispy Yet Forgiving: Between us, I’ve overworked dough before. But this? Cold butter and ice water make it tender yet sturdy—flaky edges, creamy middle—even if I squish it a little. (Yes, even on a Tuesday night.)
- Leftovers That Shine: The crust reheats like a dream—crispy again in 10 minutes, no soggy bits. I’ll make two pies on Sunday, freeze one, and still have dinner ready when the kids get home from soccer.
- Budget-Friendly Luxury: Five ingredients, all under $5 at the store. The egg adds richness, the salt balances it, and the Bisquick? It’s the shortcut that makes homemade taste better than takeout. My wallet and taste buds agree.
Step-by-step instructions for Bisquick pot pie crust recipe
Here's how to create a foolproof, no-roll crust that's flaky and quick to assemble—no pie crust skills required.
Prepare the Crust Dough
In a large bowl, combine the 1.5 cups Bisquick Original Mix, 0.5 tsp salt, 0.25 tsp black pepper, 0.5 tsp garlic powder, and 0.25 tsp dried thyme. Mix these dry ingredients together until evenly distributed—this ensures consistent seasoning throughout the crust.
Cut in the 0.75 cup unsalted butter, using a pastry cutter or two forks, until the mixture resembles coarse crumbs with pea-sized butter pieces. The butter should be cold but workable—if it feels too soft, chill the bowl for 10 minutes. Add the 1 whole large egg and mix until just combined. Then, gradually add the 0.5 cup ice water, 1 tablespoon at a time, mixing gently until the dough comes together. It should hold when pressed but still feel slightly crumbly—this is perfect for a flaky texture.
Assemble the Pot Pie
Preheat your oven to 375°F. Lightly grease a 9-inch pie dish with 1 tablespoon vegetable oil to prevent sticking. Press about two-thirds of the dough evenly into the bottom and up the sides of the pie dish, using your fingers or a rolling pin if needed. The dough should be about ¼-inch thick—don't worry if it's not perfect, as the edges will crisp up nicely.
In a separate bowl, combine the 1.5 cups cooked chicken breast, 2 cups frozen mixed vegetables, 1.5 cups chicken or vegetable broth, 0.5 cup heavy cream, and 0.5 cup sharp cheddar cheese. Stir well to create a thick, creamy filling. Pour this mixture into the prepared pie dish, spreading it evenly. The filling should come about ¾ of the way up the sides of the crust.
Top and Bake the Pot Pie
Roll out the remaining dough on a lightly floured surface using 2 tablespoons all-purpose flour to prevent sticking. Place the rolled dough over the filling, pressing gently to seal the edges. Use a sharp knife to trim any excess dough, then cut 4-6 small slits in the center to allow steam to escape. This prevents a soggy bottom and ensures a flaky top.
Bake the pot pie in the preheated oven for 45-50 minutes, until the crust is golden brown and the filling is bubbling. The edges should look crisp, and the crust should pull away slightly from the sides of the dish. If the top browns too quickly, tent it loosely with aluminum foil for the last 10 minutes to prevent over-browning.
Rest and Serve
Remove the pot pie from the oven and let it rest for 10 minutes** before serving. This resting time allows the filling to thicken slightly and the crust to set, making it easier to slice. The crust should be crisp and flaky, while the filling remains creamy and flavorful.
Serve warm, straight from the pie dish for the best experience. The combination of the flaky crust and savory filling makes this pot pie a comforting, no-fuss meal that's perfect for any night of the week.
Pro Tips For Making Bisquick Pot Pie Crust
- CHILL THE BUTTER FIRST: Take that cold butter straight from the fridge—no need to soften it. Cold butter creates flaky layers when cut into the Bisquick, and skipping this step is how you end up with a dense, tough crust instead of something light and crisp. I learned this after making three pot pies that tasted more like a brick than a pastry.
- CUT BUTTER IN SMALL ENOUGH PIECES: The goal is pea-sized chunks, not walnut-sized. When you mix the butter into the Bisquick, smaller pieces melt faster and create more steam, which is what makes the crust flaky. I used to be lazy and just tear off big hunks—now I use a pastry cutter or my fingers to break it down properly.
- DON’T OVERWORK THE DOUGH: Once the butter’s incorporated, handle the dough just enough to form a ball—no more. Every extra fold or press you make develops the gluten, which turns your crust into a chewy mess instead of a tender, melt-in-your-mouth top. I used to think more mixing = better texture, but now I stop as soon as it holds together.
- PRESS THE CRUST EVENLY: Use a rolling pin or your hands to press the dough into the pie dish, but don’t skip the edges. A thick rim won’t bake through and can get soggy from the filling. I used to slap the dough in and call it done—now I smooth it out to about ¼-inch thickness all around, including the sides.
Flavor customization for this recipe
Savory Herb Boost
Swap the dried thyme for 1 tbsp fresh rosemary or 1 tsp dried rosemary and add ½ tsp onion powder to the crust mix for a fragrant, aromatic twist. The rosemary pairs beautifully with chicken and root vegetables, adding a piney depth that complements the creamy filling.
I find this works especially well with a caramelized onion and mushroom filling—the earthy notes harmonize perfectly. 🌿
Cheesy Crust Variations
For a richer, more decadent crust, mix ½ cup shredded sharp cheddar directly into the Bisquick dough. This creates a golden, bubbly crust with a cheesy bite that pairs wonderfully with hearty fillings like pulled pork or beef stew.
If you prefer a milder flavor, use Monterey Jack instead. For extra indulgence, add ¼ cup grated Parmesan to the filling before baking.
Spicy Kick Options
Add heat with ½ tsp smoked paprika or ¼ tsp cayenne pepper to the crust mix for a subtle smoky spice. For a bolder kick, sprinkle 1 tbsp hot sauce (like Cholula) or 1 tsp chipotle powder over the filling before topping with the second crust layer.
This works especially well with a chicken and black bean filling for a Tex-Mex-inspired twist. 🌶️
Sweet & Savory Fusion
For a unique twist, add 1 tbsp brown sugar to the crust mix and top the filling with ½ cup diced apples or pears before sealing with the second crust layer.
This sweet-savory combo is unexpected but delicious, especially with a turkey and cranberry filling. The caramelized fruit adds a subtle sweetness that balances the savory flavors beautifully.
Gluten-Free Adaptation
Replace the Bisquick with a 1:1 gluten-free baking mix (like King Arthur Gluten-Free Measure for Measure) and use ½ cup gluten-free flour to bind the dough. The texture will be slightly denser but still flaky.
For extra richness, add 1 tbsp melted butter to the dough. This version works well with a vegetable or seafood filling, ensuring everyone at the table can enjoy the pie.
Crust Toppings Galore
Before baking, sprinkle the top crust with crushed potato chips (like Lay’s Classic) for extra crunch, or top with crumbled bacon for a smoky flavor. For a sweet contrast, add ½ cup crushed pretzels mixed with 2 tbsp melted butter before baking.
These toppings add texture and flavor without complicating the crust recipe itself.
Nutrition facts
Frequently asked questions
Can I make this crust ahead of time?
The crust dough can be wrapped in plastic and refrigerated for up to 24 hours before using. For best results, let it sit at room temperature for 30 minutes before pressing into the pie dish to prevent cracking. The filling can also be prepped ahead and stored separately.
Why did my crust turn out dense instead of flaky?
Overmixing the dough or using warm butter are common culprits. Always keep the butter cold and cut it into the dry ingredients until pea-sized pieces remain. Also, avoid pressing the dough too firmly when shaping—keep it about ¼-inch thick for that perfect flaky texture.
What’s the best way to reheat leftovers?
For individual servings, microwave for 1-2 minutes covered with a damp paper towel to restore crispiness. For the whole pie, bake at 350°F for 15-20 minutes covered with foil, then uncover for the last 5 minutes to crisp the top.
Can I use this crust for other dishes besides pot pie?
Yes! This same crust works perfectly for shepherd’s pie, chicken pot pie, or even a savory tart. The no-roll method makes it ideal for handheld appetizers too—just press the dough into mini muffin tins and fill with your favorite mixture before baking.
How do I prevent a soggy bottom crust?
Always cut 4-6 small slits in the top crust to release steam, and bake on the middle rack for even heat distribution. For extra insurance, sprinkle a pinch of all-purpose flour over the bottom crust before adding filling to create a barrier.