
Main Courses
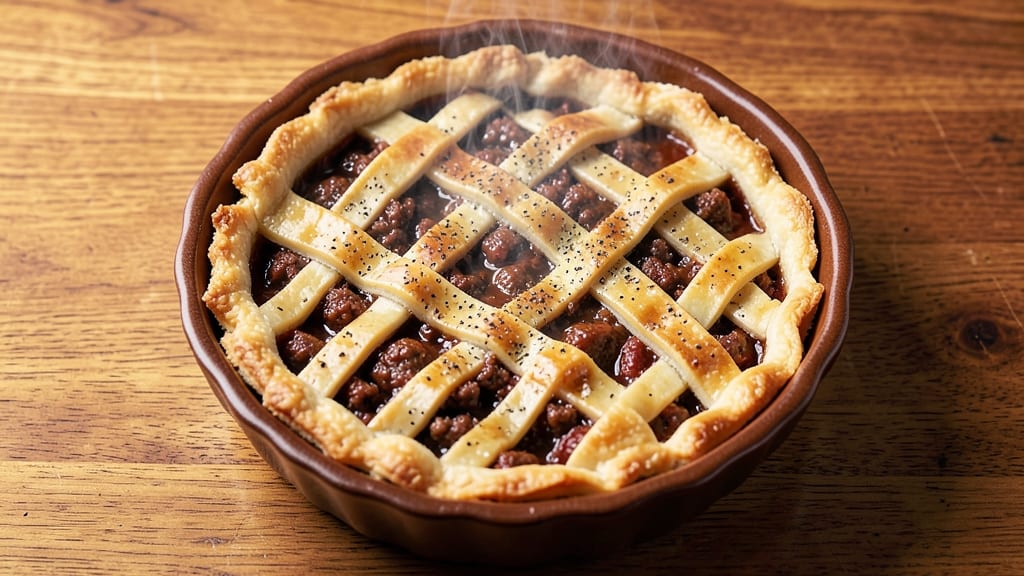
Grandma's meat pie recipe delivers the kind of flaky crust and rich filling that makes every bite feel like a warm hug from the past. The secret lies in a precise dough technique—cold butter cut into flour creates those signature layers that shatter when you cut in.
I've perfected this method through years of holiday baking, ensuring the crust stays crisp at the edges while remaining tender underneath.
What sets this recipe apart is the balance between tradition and practicality. The filling simmers slowly with tender beef, root vegetables, and a rich gravy that thickens just enough to hold everything together.
You'll assemble the pie with confidence, knowing each layer has been prepared to deliver maximum flavor and texture. The result is a golden, bubbling pie that smells like home the moment you open the oven door.
This recipe yields a complete, ready-to-serve dish with all the classic elements: a flaky crust that holds its shape, a filling so savory it disappears with each bite, and a presentation that looks as good as it tastes.
Whether you're serving it at a family gathering or simply enjoying a comforting meal at home, every detail has been carefully crafted for professional-quality results.
For those short on time, I've included optional modern twists like puff pastry for the crust or a quicker filling preparation method. The traditional lattice crust option adds visual appeal while maintaining the same delicious outcome. Let's bring Grandma's meat pie to life in your own kitchen.
Ingredients for grandma's meat pie
Cold butter, tender beef, and root veggies—this pie tastes like home.
| Ingredient | Amount | Notes |
|---|---|---|
| Unsalted Butter 🧈 | 1 cup | Cold, cubed for flaky crust |
| All-Purpose Flour 🌾 | 3 cups | Sifted for light texture |
| Ice Water 💧 | ½ cup | Chilled for dough binding |
| Salt 🧂 | 1 tsp | Fine sea salt preferred |
| Ground Black Pepper 🌶️ | ½ tsp | Freshly cracked for flavor |
| Lean Ground Beef 🥩 | 1 ½ lb | 80/20 fat ratio preferred |
| Carrots 🥕 | 1 ½ cups | Diced small, uniform pieces |
| Russet Potatoes 🥔 | 2 medium | Peeled, diced into 1/2-inch cubes |
| Yellow Onion 🧅 | 1 medium | Finely chopped, sweet variety |
| Beef Broth 💧 | 1 ½ cups | Low-sodium preferred |
| Tomato Paste 🍅 | 2 tbsp | Smooth, no-sugar-added |
| Dried Thyme 🌿 | 1 tsp | Or 1 tbsp fresh thyme |
| Dried Parsley 🌿 | 1 tsp | For garnish and flavor |
| All-Purpose Flour 🌾 | 2 tbsp | For dusting pie dish |
| Egg 🥚 | 1 whole | For egg wash |
The butter needs to stay cold—cut it into 1/2-inch cubes and keep it in the freezer until ready to mix. Store-brand butter works fine, but if you've got European-style with higher fat content, even better. For the flour, King Arthur or Bob's Red Mill brands are my go-to—they're sifted and consistent. The beef is where the magic happens; 80/20 fat ratio gives you that rich, juicy filling. If you're using pre-ground, check the label—some stores sell leaner versions that dry out. The carrots and potatoes should be uniform size so they cook evenly. I usually peel and chop them right before mixing everything together.
No beef broth? Chicken broth with a splash of Worcestershire sauce works in a pinch. Fresh thyme is ideal, but dried at one-third the amount is fine. The tomato paste can be the squeeze tube kind—Trader Joe's has great ones that last forever. For the crust, if you're short on time, puff pastry from the store gives you that flaky texture without the fuss. Just brush it with egg wash before baking. The filling can be prepped a day ahead—it actually tastes better after sitting overnight as the flavors meld together.
This pie keeps beautifully in the fridge for 4-5 days, though it's best enjoyed fresh. For leftovers, reheat in a 350°F oven for 20 minutes until bubbly. Freezes for 3 months if wrapped tightly in foil. I always make a double batch—one for dinner, one for lunches. The crust stays crisp even after reheating if you bake it at a lower temperature (325°F instead of 375°F) for the first 20 minutes.
Why You'll Love This Recipe
- Five-Minute Dough: The crust comes together faster than you can say "shortcut." Just cold butter, flour, ice water, and a pinch of salt—no mixer, no fuss. Roll it out while the filling simmers, and you’re golden.
- Golden Crust Magic: That flaky, buttery top? All thanks to chilled butter cut into the dough like tiny ice cubes. It’s the kind of texture that makes you pause mid-bite—worth the extra two minutes of patience.
- Potluck Hero: Between us, this pie is the only thing I bring to gatherings. It reheats beautifully, feeds a crowd without leftovers (well, minimal leftovers), and no one judges if you slice it straight from the pan.
- Budget Warmth: A pound of ground meat, a few spices, and that buttery crust stretch to feed four for dinner and two for lunch the next day. Honestly, it’s my go-to when grocery money’s tight—but no one ever guesses.
Step-by-step instructions for Grandma's meat pie recipe
Here's how to build that perfect flaky crust and rich filling that'll make your pie taste like Grandma's.
Make the Flaky Pastry Dough
Cut the 1 cup unsalted butter into ½-inch cubes and chill in the freezer for 10 minutes. This keeps it firm for perfect flakiness. In a large bowl, whisk together the 3 cups all-purpose flour and 1 teaspoon salt. Add the chilled butter cubes and use your fingers or a pastry cutter to work the butter into the flour until it resembles coarse crumbs with some pea-sized pieces remaining.
Drizzle in the ½ cup ice water slowly while stirring with a fork. Mix just until the dough begins to come together—don't overwork it. Form into a disk, wrap in plastic, and refrigerate for at least 1 hour. This resting time relaxes the gluten and makes rolling easier. The dough should be cold but pliable when ready to use.
Prepare the Savory Filling
In a large skillet over medium-high heat, cook the 1.5 pounds lean ground beef until browned, breaking it apart with a wooden spoon. Drain all but 2 tablespoons of fat from the pan. Add the 1 medium yellow onion and 1.5 cups diced carrots, cooking for 5 minutes until softened. Stir in the 2 tablespoons tomato paste and cook for another 2 minutes to deepen the flavor.
Add the 2 medium russet potatoes (previously peeled and diced), 1.5 cups beef broth, 1 teaspoon dried thyme, and ½ teaspoon ground black pepper. Bring to a simmer, then reduce heat to low and cook for 15 minutes, stirring occasionally, until the potatoes are tender. Remove from heat and let cool slightly—this prevents steam from making the crust soggy.
Assemble the Pie
Preheat your oven to 375°F. Roll out half of the chilled pastry dough on a lightly floured surface into a 12-inch circle. Transfer to a 9-inch pie dish, pressing gently to fit. Trim excess dough from the edges, leaving about ½ inch overhang. Sprinkle the bottom of the crust with 2 tablespoons all-purpose flour to prevent sticking.
Pour the cooled filling into the crust, mounding it slightly in the center. Roll out the remaining dough and place it over the filling. Seal the edges by pinching them together with your fingers or a fork. Cut a few small slits in the top crust to allow steam to escape. Brush the top crust with the 1 whole egg beaten with a splash of water, then sprinkle with 1 teaspoon dried parsley for color.
Bake to Golden Perfection
Place the pie on a baking sheet lined with parchment paper to catch any drips. Bake in the preheated oven for 45 minutes until the crust is deep golden brown and the filling is bubbling through the slits. If the edges brown too quickly, cover them with aluminum foil.
For the last 10 minutes, increase the oven temperature to 400°F to ensure a crisp crust. Let the pie cool for at least 1 hour before slicing—this allows the filling to set and makes serving easier. The result should be a flaky, buttery crust hugging a rich, savory filling that tastes just like Grandma's.
Pro Tips For Making Grandma'S Meat Pie
- Chill the Dough: After mixing your butter, flour, and ice water, pop the dough in the fridge for at least 30 minutes—yes, even if you’re eager to roll it out. I used to skip this and end up with a pie crust that spread like wildfire in the oven. Cold butter = flaky layers, not a sad, greasy mess.
- Cut Butter in Cold: Work your butter and flour together until the mixture looks like coarse crumbs, not wet sand. I learned this the hard way—when the dough turned out tough, I realized I hadn’t cut the butter into enough tiny pieces. A fork or pastry cutter does this faster than your hands, and it’s the thing that matters most for that melt-in-your-mouth texture.
- Blind-Bake the Crust: If your pie filling is wet (like a meat ragù), pre-bake the crust with pie weights or dried beans for 15 minutes at 375°F before adding the filling. I was skeptical until I tried it—now I never risk a soggy bottom. Just brush the crust with a little egg wash after baking for extra shine.
- Seal the Edges: Crimp the pie crust edges with your fingers or a fork, but first, dampen them slightly with water. This keeps the seams tight and prevents the filling from leaking out like a poorly sealed jar. (Your future self will thank you when the pie stays intact in the oven.)
Common mistakes when making this recipe
Overworking the Dough
I've ruined more crusts than I'd admit by overmixing the dough. Once the butter and flour come together, stop stirring the moment it forms a shaggy mass—overworking develops gluten, making the crust tough instead of flaky.
Work quickly and keep your hands cold by dipping them in ice water if needed. The dough should hold together when gently pressed but still feel slightly crumbly. 💡
Skipping the Rest
The 1-hour rest for the dough isn't optional—it's non-negotiable. Without it, the gluten tightens up, and you'll end up with a dense, chewy crust instead of the light, buttery layers you want.
If you're in a hurry, chill the dough for at least 30 minutes, but I promise you'll notice the difference with the full hour. The same goes for the filling—let it cool completely before assembling to prevent a soggy bottom.
Underestimating Butter Temperature
Room-temperature butter is the enemy of flaky crusts. The butter needs to stay cold enough to create those beautiful layers when it melts in the oven. If your kitchen is warm, freeze the butter cubes for 15 minutes before mixing.
I've seen cooks use butter straight from the fridge, and while it works, the dough can become too stiff—just don't let it get too soft either. The ideal texture is like coarse cornmeal with some pea-sized butter pieces remaining.
Uneven Filling Distribution
A common mistake is piling all the filling in the center, leaving thin edges. Spread the filling evenly across the bottom crust to prevent a lopsided pie. Press down gently to remove air pockets, which can cause the crust to puff up unevenly.
I like to mound the filling slightly higher in the center—it settles as it bakes, creating a perfect dome shape. Also, don't overfill the crust; leave about ½ inch of space at the top to prevent overflow during baking.
Forgetting the Egg Wash
Skipping the egg wash is a rookie move. The egg wash (beaten egg + water) gives the crust that golden, glossy finish we all love. Brush it on the top crust right before baking, and don't forget the edges!
For extra shine, add a splash of milk to the egg wash. Pro tip: Save the leftover egg wash for brushing onto bread or rolls—it's perfect for achieving that bakery-style crust. 🥚
Baking Without Ventilation
If you don't cut those steam vents in the top crust, you'll end up with a pie that looks like a drum instead of a beautiful golden dome. Cut 3-4 small slits or use a fork to create a lattice pattern.
This allows steam to escape, preventing the crust from puffing up unevenly. Without ventilation, the filling can also make the crust soggy. Trust me, those little slits make all the difference in the final presentation and texture.
Nutrition facts
Frequently asked questions
Can I use store-bought puff pastry instead of homemade dough?
For a quicker version, use 1 sheet of frozen puff pastry instead of the homemade dough. Just thaw it according to package instructions, brush with egg wash, and proceed with assembly. The result will still be flaky and delicious, though the homemade crust has that extra rustic charm.
How do I make this pie ahead of time?
Assemble the pie completely (including the top crust) and refrigerate for up to 24 hours before baking. For even better flavor, prepare the filling a day ahead and refrigerate it. When ready to bake, remove from the fridge 30 minutes before going into the oven. The pie can also be baked ahead, cooled, and reheated in a 350°F oven for 20 minutes to restore crispness.
What's the best way to reheat leftovers?
Slice the pie and reheat individual portions in a 350°F oven for 15-20 minutes until bubbly. For microwave reheating, cover with a damp paper towel and heat in 30-second intervals until warmed through. The crust stays crispier when oven-reheated, but microwave works in a pinch. Never reheat straight from the fridge—bring to room temperature first.
Can I substitute ground turkey or chicken for the beef?
Yes, but adjust the cooking time. Ground turkey or chicken will cook faster than beef, so remove it from the pan once it reaches 165°F instead of browning fully. For extra flavor, add 1 teaspoon smoked paprika or ½ teaspoon garlic powder to compensate for the milder taste. The texture will be slightly different but still delicious.
What's the secret to a perfect lattice crust?
Roll out the top dough to 1/8-inch thickness and cut strips with a sharp knife. Weave them in a classic lattice pattern, leaving 1-inch gaps between sections for steam to escape. Brush the exposed filling with egg wash before baking for extra browning. The key is patience—take your time with the cuts for clean lines.