
Desserts
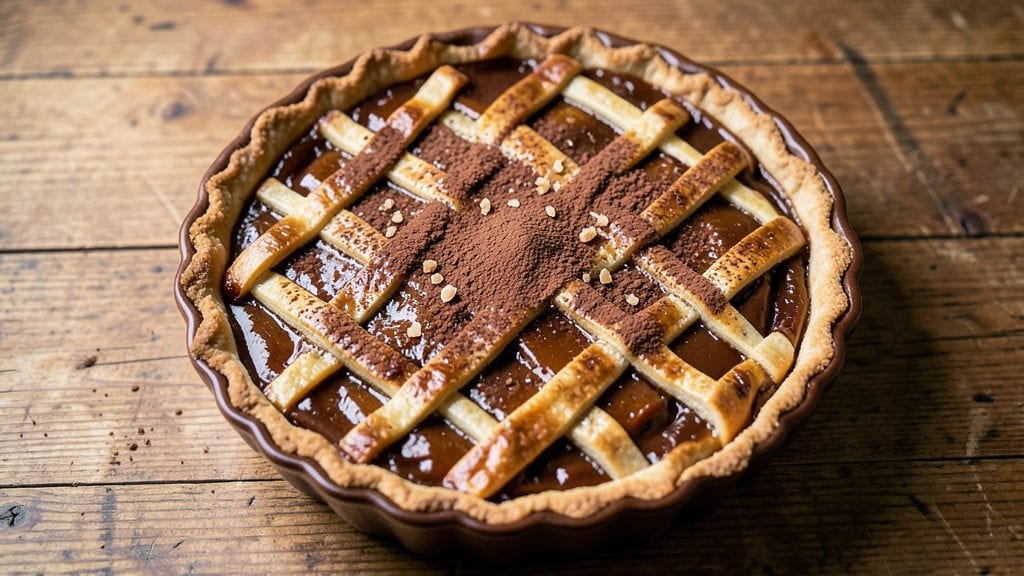
Miss Daisy's fudge pie recipe delivers a dessert so rich and indulgent it feels like a hug from your favorite Southern grandmother. The secret lies in that molasses-kissed crust—a deep, caramelized base that pairs perfectly with the velvety chocolate filling.
I first tasted this version at a family reunion where the pie disappeared in under an hour, and now it's my go-to recipe for any celebration.
What makes this pie truly special is the balance between the crust and filling. The crust gets its signature flavor from molasses and brown sugar, creating a subtle sweetness that complements—not overpowers—the deep chocolate taste of the filling.
The filling itself is a foolproof blend of butter, sugar, eggs, and cocoa powder, baked until just set with a crackly top that begs to be broken into.
By the time you slice into this pie, you'll have a dessert that's restaurant-quality without requiring advanced techniques. The crust stays crisp around the edges while remaining tender in the center, and the filling is rich yet light enough to cut cleanly.
Serve it warm with a scoop of vanilla ice cream or a dollop of whipped cream for the ultimate indulgence.
This recipe is perfect for holidays, potlucks, or whenever you need to impress with a dessert that tastes homemade but feels like a special occasion. The molasses crust adds a unique depth that sets it apart from traditional fudge pies, making it a crowd-pleaser every time. Let's get baking!
Ingredients for miss daisy's fudge pie
Rich molasses crust meets velvety chocolate filling—just 12 ingredients for a dessert that tastes like Southern hospitality.
| Ingredient | Amount | Notes |
|---|---|---|
| Unsalted Butter 🧈 | 1 cup | Cold, cubed for crust |
| All-Purpose Flour 🌾 | 1 ½ cups | Sifted for crust |
| Light Brown Sugar 🍚 | ¾ cup | Packed, for crust |
| Molasses 🍯 | ¼ cup | Unsulphured preferred |
| Dark Brown Sugar 🍚 | 1 ½ cups | Packed, for filling |
| Unsweetened Cocoa Powder 🍫 | ½ cup | Dutch-processed preferred |
| Large Eggs 🥚 | 2 whole | Room temperature |
| Evaporated Milk 🥛 | 1 cup | Full-fat preferred |
| Vanilla Extract 🌸 | 1 tbsp | Pure, not imitation |
| Salt 🧂 | ½ tsp | Fine sea salt |
| Baking Powder 🍞 | 1 tsp | For crust lift |
| Vanilla Ice Cream 🍦 | 2 cups | For serving |
The molasses is the soul of this pie. Grocery store brands work, but unsulphured molasses from Whole Foods or Trader Joe's has that deeper, caramelized flavor. Look for it in the baking aisle near the spices—it should be thick, dark, and smell like caramel. The brown sugars? Light for the crust, dark for the filling. Don't substitute white sugar here—it changes the texture completely. For the cocoa powder, Hershey's Special Dark or Dutch-processed brands give you that rich, velvety finish. If you're making this ahead, store the dry ingredients in airtight containers for up to 6 months—they'll keep their freshness.
No molasses? Maple syrup works in a pinch, but reduce it first to thicken it up. Short on evaporated milk? Heavy cream thinned with a splash of water mimics the richness. The crust gets its lift from baking powder, but if you're out, 1/4 tsp baking soda plus 1/2 tsp lemon juice does the trick. For the vanilla, pure extract is non-negotiable—imitation smells like perfume. The butter should be cold when you cut it into the flour—microwave for 10 seconds if it's too soft. And if you're feeling fancy, add a pinch of cinnamon to the crust for warmth. Trust me, it's worth it.
This pie tastes even better the next day—cover it tightly and refrigerate for up to 4 days. To reheat, warm slices in the oven at 350°F for 5-7 minutes until the filling is gooey. The crust stays crisp if you store it in one piece—slice right before serving. Freeze portions in individual slices wrapped in plastic for up to 3 months. I always make a double batch—half for the family, half for neighbors who always 'forget' to bring anything to potlucks.
Why You'll Love This Recipe
- One-Bowl Wonder: I swear by this recipe because it’s that simple—just toss everything into one bowl, mix it up, and bake. No fussing with pie crusts or layers, and the molasses and brown sugars melt together like magic.
- Rich Without Effort: That deep, caramelized molasses flavor? It’s like a hug in dessert form, but the butter and flour keep it from being too heavy. Honestly, the first time I made it, I thought, "Why didn’t I do this sooner?"
- Holiday or Weeknight: Between us, this pie is my go-to for potlucks and lazy Sundays. The crust is sturdy enough for company but still melts in your mouth—no one will guess it’s this easy. (Yes, even on a Tuesday night.)
- Budget-Friendly Luxury: A whole pie for under $10? With pantry staples like flour and sugar, this is my secret weapon for feeding a crowd without breaking the bank. And leftovers? They disappear faster than I can say "third slice."
Instructions for miss Daisy's fudge pie recipe
Here's how to create that perfect balance of molasses-spiced crust and velvety chocolate filling.
Prepare the Molasses-Kissed Crust
Preheat your oven to 350°F and cut the 1 cup unsalted butter into small cubes, keeping them cold. In a large bowl, whisk together the 1.5 cups all-purpose flour, 0.75 cup light brown sugar, 0.5 tsp salt, and 1 tsp baking powder. The mixture should look like coarse crumbs with some sandy texture.
Add the cold butter cubes and use a pastry cutter or your fingers to work them into the flour mixture until the texture resembles coarse cornmeal. This ensures a flaky, tender crust rather than a dense one. Press two-thirds of this mixture firmly into a 9-inch pie dish, creating an even layer about ¼-inch thick. The edges should be slightly higher than the center for proper baking.
In a small bowl, combine the 0.25 cup molasses with 1 tablespoon cold water. Brush this mixture evenly over the crust, including the edges. This creates that signature molasses flavor and helps create a beautiful golden-brown crust. Place the prepared crust in the refrigerator while you make the filling.
Bake the Crust Until Set
Bake the crust for 15 minutes until it's just beginning to turn golden at the edges. You'll see the color deepen from pale to a soft amber. Press down gently with your finger—it should hold its shape but still feel slightly soft in the center. This partial baking prevents a soggy bottom when you add the hot filling later.
Remove the crust from the oven and let it cool for 10 minutes. While it's cooling, prepare your baking sheet by lining it with parchment paper. This will make cleanup easier when you inevitably have chocolate splatters. The crust should be warm but not hot to the touch when you're ready to add the filling.
Make the Rich Chocolate Filling
In a medium saucepan, combine the 1.5 cups dark brown sugar, 0.5 cup unsweetened cocoa powder, 2 whole large eggs, 1 cup evaporated milk, 1 tablespoon vanilla extract, and 0.5 tsp salt. Whisk everything together until smooth and fully combined. The mixture should be thick but pourable.
Place the saucepan over medium heat and cook, stirring constantly with a wooden spoon, for 8-10 minutes. You'll notice the mixture begin to thicken and bubble gently. It's ready when it reaches a temperature of 160°F on a candy thermometer and coats the back of a spoon. If you don't have a thermometer, test by placing a small amount on a chilled plate—it should wrinkle slightly when pushed with your finger.
Immediately pour the hot filling into the pre-baked crust. Use a spatula to spread it evenly, making sure to cover all areas, including the edges. The filling should come about ½-inch below the crust's top edge, allowing room for the pie to puff slightly during baking.
Bake to Golden Perfection
Return the pie to the oven and bake for 40-45 minutes until the filling is set but still slightly jiggly in the center. You'll know it's done when the edges are golden brown and the center has a slight wobble when gently shaken. The pie should pull away slightly from the edges of the crust, indicating it's fully baked.
Remove the pie from the oven and let it cool completely on a wire rack for at least 2 hours. This cooling time is crucial—it allows the filling to set properly and prevents a runny pie. If you're impatient like me, you can refrigerate it for 1 hour to speed up the process, but don't skip this step entirely.
Serve with Vanilla Ice Cream
Once the pie is completely cool, it's time to serve. Scoop 2 cups vanilla ice cream into individual bowls and place a slice of pie next to each serving. The contrast of warm pie with cold ice cream creates the perfect balance of temperatures and textures. Cut the pie into 8 equal wedges using a sharp knife heated briefly under hot water—this ensures clean slices.
For the best experience, serve immediately. The pie will keep well in the refrigerator for up to 3 days, but it's at its finest when freshly baked. Each bite should deliver that perfect combination of molasses-spiced crust and rich, velvety chocolate filling, with the ice cream providing a delightful cool contrast.
Pro Tips For Making Miss Daisy'S Fudge Pie
- Whisk Butter Until Foamy: Don’t just melt the butter—whisk it over low heat until it’s pale and actually foamy, not just liquid. I used to skip this, and the filling always tasted flat. It’s the difference between "good" and "holy-smokes-this-is-amazing."
- Measure Molasses Precisely: Molasses is thick and clings to spoons like it’s auditioning for a horror movie. Use a kitchen scale if you can—3.5 ounces is not the same as "a splash." Too little, and your pie tastes like sugar; too much, and it’s a science experiment.
- Bake Until the Center Jiggles: The filling should look set but still wobble slightly in the middle when you shake the pan. If it’s rock-solid, it’ll crack when cooling. Pull it out when the edges are set but the center has that "just-about-there" jelly vibe.
- Chill the Filling First: Pour the hot filling into a greased 9-inch pie dish, then pop it in the fridge for 10 minutes before baking. This prevents a runny mess and helps the crust hold up. Yes, it’s an extra step—but your crust will thank you.
Common mistakes when making your miss daisy's fudge pie
Overbaking the Crust
One of the most common mistakes is baking the crust too long before adding the filling. If you bake it beyond 15 minutes, it can become too dry and lose its tender texture. The crust should just be setting at the edges—not fully golden.
I’ve seen people walk away while it’s in the oven, only to return to a crispy, overdone base that cracks under the filling’s weight. 🌡️
To avoid this, set a timer and check frequently. The crust should hold its shape when pressed gently but still feel slightly soft in the center. If it starts to darken too quickly, tent it loosely with aluminum foil to prevent over-browning while maintaining structure.
Skipping the Pre-Bake
Many home bakers skip pre-baking the crust entirely, thinking it’s unnecessary. Big mistake! Without that initial 15-minute bake, the hot filling will turn your crust soggy. The crust needs to set enough to handle the moisture from the chocolate mixture.
I’ve had pies where the crust absorbed so much liquid that it turned to mush—disastrous for presentation and texture. 🚫
If you’re short on time, at least chill the crust for 30 minutes in the fridge before adding the filling. This helps it firm up slightly and prevents a soggy bottom. For extra insurance, blind-bake the crust (with pie weights or dried beans) for 10 minutes before adding the filling.
Undercooking the Filling
The filling is the star of this pie, and undercooking it is a cardinal sin. If you pull it out too soon, the center will remain runny and unappetizing. The filling should reach 160°F and coat the back of a spoon—this ensures it sets properly but stays creamy.
I’ve had pies where the filling was barely set, oozing out when sliced, and it ruined the whole experience. 🍫
Use a candy thermometer for accuracy, or do the "wrinkle test": Drop a small amount of filling on a chilled plate. If it wrinkles when touched, it’s ready. If not, give it another 2-3 minutes of cooking. Never rush this step—patience here makes all the difference.
Overfilling the Pie
Overfilling is a surefire way to end up with a messy, uneven pie. The filling should come only ½-inch below the crust’s top edge, leaving room for it to puff slightly during baking.
I’ve seen pies where the filling spilled over the edges, creating a sticky disaster that’s hard to clean. The pie should look like a dome, not a volcano. 🌋
If your filling is too thick to pour easily, warm it gently over low heat while stirring. If it’s too thin, simmer it longer until it thickens. And always use a spatula to spread it evenly, including the edges—this prevents gaps where the crust might burn.
Not Cooling Properly
Skipping the cooling step is a rookie mistake. If you slice into the pie too soon, the filling will be too soft and the crust may crumble. The pie needs at least 2 hours to cool completely on a wire rack.
I’ve had guests complain about pie that was too runny because I couldn’t wait to serve it. Patience here ensures clean slices and the perfect texture. ⏳
If you’re in a hurry, refrigerate the pie for 1 hour before slicing, but don’t skip the full cooling time entirely. The filling will firm up as it cools, giving you that ideal fudge-like consistency. Trust the process—it’s worth the wait!
Nutrition facts
Frequently asked questions
Can I make this pie without molasses?
If you don't have molasses, substitute with ¼ cup maple syrup or 3 tablespoons honey mixed with 1 tablespoon water. Reduce other liquids slightly (like evaporated milk) to maintain balance. The crust will still develop flavor, though the molasses gives that signature caramel depth.
How do I prevent the crust from cracking?
Cracking usually happens when the crust bakes too long before adding filling. Pre-bake for exactly 15 minutes until edges are set but still soft. Chill the crust 10 minutes before adding filling, and avoid overfilling—keep it ½-inch below edges. For extra insurance, poke the crust with a fork before baking to release trapped air.
Can I use a different type of crust?
While the molasses crust is traditional, you can adapt this recipe! Try a gingersnap crust (crush 1.5 cups gingersnaps + 6 tbsp melted butter) or a graham cracker crust (1.5 cups crumbs + 6 tbsp butter). For a lighter option, use a puff pastry—just reduce baking time to 10 minutes before adding filling. The flavor will differ, but the technique remains the same.
Why did my filling turn grainy?
Graininess usually means the filling was overcooked or the cocoa powder wasn't properly dissolved. Whisk all ingredients thoroughly before heating, and remove from heat the moment it reaches 160°F. If using powdered sugar instead of brown sugar, sift it first to avoid lumps. Stir constantly while cooking to prevent scorching.
How long can I store leftovers?
Store covered at room temperature for 2 days, or refrigerate for up to 4 days. For longer storage, wrap individual slices in plastic and freeze for 3 months. Thaw overnight in the fridge—never microwave, as it makes the filling rubbery. The crust stays crisp if stored in one piece.