Main Courses
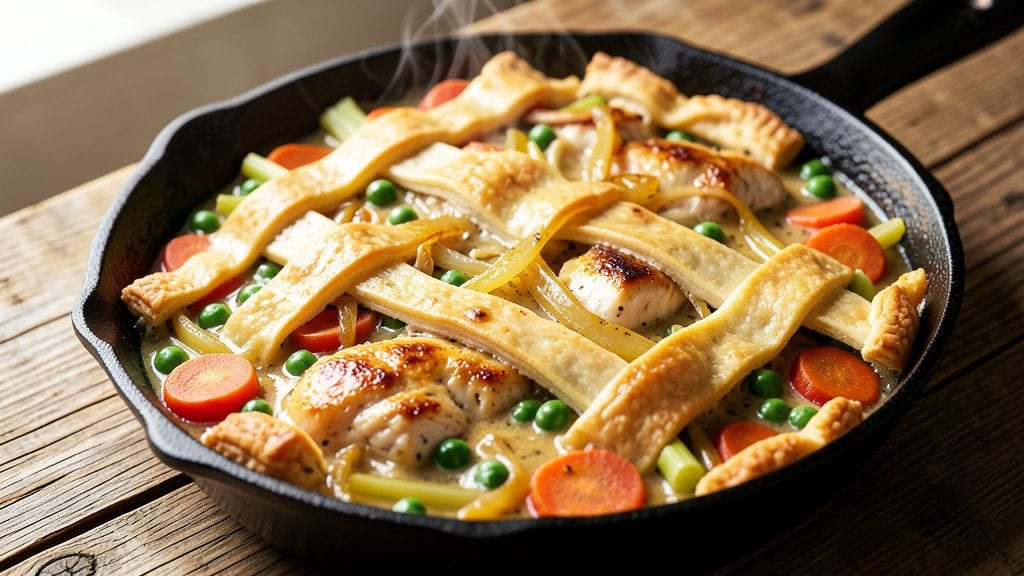
Creating a Pillsbury classic pot pie brings comfort food to life with its flaky crust and hearty filling—all in one easy-to-make dish.
This recipe simplifies the process by using Pillsbury’s pre-made crust, so you can focus on crafting a savory filling that’s packed with tender chicken, fresh vegetables, and a rich gravy. The beauty of this method is that it delivers restaurant-quality results without the fuss of homemade dough.
The secret to a perfect pot pie lies in balancing textures and flavors: crispy, golden crust on top and a tender, flavorful filling underneath. You’ll start by sautéing chicken and vegetables until they’re just tender, then building a velvety gravy that ties everything together.
The Pillsbury crust adds a buttery, flaky finish that’s impossible to resist. With just a few simple steps, you’ll have a warm, comforting meal ready in under an hour.
This classic pot pie is ideal for weeknight dinners, family gatherings, or anytime you crave a hearty, satisfying meal. The filling can be customized with your favorite vegetables or proteins, making it versatile enough for any taste.
Whether you’re feeding a crowd or treating yourself to a cozy solo dinner, this recipe delivers on both ease and flavor.
Once baked, the crust will be golden and crisp, while the filling stays tender and rich—just like grandma used to make. Serve it with a side salad or crusty bread to soak up every last bit of gravy. Let’s get started on creating this timeless comfort classic!
Ingredients for pillsbury classic pot pie
Pillsbury crust plus a handful of pantry staples. That's all you need for this cozy classic.
| Ingredient | Amount | Notes |
|---|---|---|
| Pillsbury Classic Pie Crust 🥧 | 1 package | Unrolled, ready for filling |
| Boneless Chicken Breast 🍗 | 1 ½ lb | Cut into bite-sized pieces |
| Yellow Onion 🧅 | 1 whole | Diced, medium size |
| Carrots 🥕 | 1 ½ cups | Peeled, sliced into rounds |
| Green Peas 🌿 | 1 cup | Fresh or frozen, thawed |
| Celery Stalks 🧅 | 2 whole | Diced, medium ribs |
| Garlic Cloves 🧄 | 4 cloves | Minced, fresh preferred |
| All-Purpose Flour 🌾 | 2 tbsp | For gravy thickening |
| Chicken Broth 💧 | 1 ½ cups | Low-sodium preferred |
| Heavy Cream 🥛 | ½ cup | Full-fat for creaminess |
| Salt 🧂 | 1 tsp | Kosher or sea salt |
| Black Pepper 🌶️ | ½ tsp | Freshly ground preferred |
| Dried Thyme 🌿 | ½ tsp | Or 1 tsp fresh thyme |
| Unsalted Butter 🧈 | 2 tbsp | For crust brushing |
| Egg 🥚 | 1 whole | For egg wash |
The Pillsbury crust is the star here—grab the classic pie crust from the refrigerated section. It's pre-rolled and ready to go, saving you dough time. For the chicken, boneless breasts work best (thighs can make the filling too greasy). I always buy mine from Costco when I'm making a big batch, but any supermarket will do. Look for fresh, bright vegetables—they'll keep the filling vibrant. Frozen peas? Totally fine, just thaw them first. The carrots should be firm and crisp, not rubbery.
No chicken broth? Vegetable broth works too, but you'll need to add a splash of soy sauce for depth. Short on thyme? Dried oregano at half the amount gets you close. The flour is just for thickening—if you don't have any, cornstarch works 1:1. For extra richness, swap half the chicken broth for white wine. The Pillsbury crust is unsalted, so don't forget the salt in the filling. And trust me on the full-fat heavy cream—it makes the gravy silky smooth.
This pie reheats beautifully—just cover with foil and warm in the oven for 15-20 minutes. Leftovers keep for 3-4 days in the fridge, but honestly, it's even better the next day. The crust stays crispy if you store it in an airtight container. For make-ahead prep, assemble the pie (without baking) and refrigerate for up to 24 hours. The filling will taste even more developed after chilling.
Why You'll Love This Recipe
- No-Fuss Assembly: I swear by this recipe because it’s the kind of meal where you can have dinner on the table without stressing. Slice the chicken, chop the veggies—boom, done. The Pillsbury crust does all the heavy lifting while you’re stirring the creamy sauce.
- Golden Crust Magic: That crispy, flaky top? It’s the star. The moment you pull it out of the oven, the aroma of caramelized onions and buttery crust hits you like a hug. Honestly, the peas might be simple, but they’re the perfect little sweet pop against the savory chicken.
- Weeknight & Leftovers: Between us, this is my go-to for busy nights and lazy Sundays. Double the batch—it reheats beautifully, and the crust stays just as good the second day. My kids beg for it, and my partner never complains about leftovers.
- Budget-Friendly Comfort: Chicken thighs or breasts, a bag of frozen peas, and a few carrots—this recipe stretches a dollar without sacrificing flavor. Plus, the Pillsbury crust is a pantry staple that makes it feel fancy without the markup. Solid win for any grocery budget.
Step-by-step instructions for Pillsbury classic pot pie
Here's how to create a comforting, restaurant-quality pot pie with that perfect flaky crust you crave.
Cook the Chicken and Sauté the Vegetables
In a large oven-safe skillet, melt the 2 tablespoons unsalted butter over medium-high heat. Add the 1.5 lb boneless chicken breast cut into bite-sized pieces and cook for 5-6 minutes, stirring occasionally, until the chicken is cooked through and lightly browned on all sides. Remove the chicken and set it aside on a plate.
In the same skillet, add the 1 whole yellow onion and 2 whole celery stalks, both diced, along with the 1.5 cups carrots sliced into rounds. Cook for 5-6 minutes until the vegetables begin to soften. Add the 4 cloves garlic cloves, minced, and cook for another 30 seconds until fragrant. You'll know they're ready when the garlic releases its aroma and the vegetables are tender but still hold their shape.
Make the Creamy Gravy
Lower the heat to medium and sprinkle the 2 tablespoons all-purpose flour evenly over the vegetables. Stir well to coat the vegetables and the bottom of the skillet, allowing the flour to toast slightly for 1 minute. This step is crucial for thickening the gravy and adding depth of flavor.
Gradually pour in the 1.5 cups chicken broth while stirring continuously to prevent lumps from forming. Bring the mixture to a gentle simmer and let it cook for 3-4 minutes until it begins to thicken. Stir in the 0.5 cup heavy cream, 1 teaspoon salt, 0.5 teaspoon black pepper, and 0.5 teaspoon dried thyme. Return the cooked chicken to the skillet and stir gently to combine. Add the 1 cup green peas and cook for an additional 2 minutes to heat everything through.
Prepare and Assemble the Crust
Preheat your oven to 375°F. Unroll the 1 package Pillsbury Classic Pie Crust on a clean surface. Brush the top of the vegetable and chicken mixture in the skillet with the 1 whole egg beaten with a fork, making sure to cover the edges as well. This egg wash will give the crust that golden, glossy finish.
Carefully place the unrolled pie crust over the skillet, pressing gently to ensure it covers the filling completely. Trim any excess crust hanging over the edges of the skillet with a sharp knife. Cut 4-5 small slits in the center of the crust to allow steam to escape during baking. This prevents the crust from puffing up too much and ensures a flaky texture.
Bake to Golden Perfection
Transfer the skillet to the preheated oven and bake for 35-40 minutes until the crust is golden brown and the filling is bubbling around the edges. The crust should be crisp and flaky, with a slight puff in the center. If the crust starts to brown too quickly, tent it loosely with aluminum foil to prevent over-browning while it continues to cook.
Remove the pot pie from the oven and let it rest for 10 minutes before serving. This resting time allows the filling to set slightly and makes it easier to serve without spilling. The crust will be hot and the filling will be creamy and flavorful, with tender chicken and perfectly cooked vegetables. Serve warm and enjoy your homemade pot pie!
Pro Tips For Making Pillsbury Classic Pot Pie
- Trim Chicken Properly: Cut the boneless chicken breast into 1-inch cubes—no bigger, or they’ll stay tough. I learned this the hard way after serving rubbery chicken in my first pot pie. A sharp knife and a steady hand make this step worth the extra 2 minutes.
- Sauté Onions Low and Slow: Cook the yellow onion at medium heat until soft, not browned—this prevents bitterness in the filling. After burning three batches, I finally figured out that rushing this step ruins the whole dish. Patience here guarantees flavor later.
- Pre-Cook Carrots Halfway: Parboil the carrots for 3-4 minutes before adding them to the pot pie filling. This keeps them tender without turning to mush. Sounds weird, but it works—your crust won’t end up soggy from overcooked veggies.
- Brush Crust with Egg Wash: Mix 1 egg with 1 tablespoon water, then brush the top crust generously before baking. This isn’t just for looks—it guarantees a golden finish and prevents the crust from turning pale and sad. (Yes, even if you’re impatient like me.)
Pro cooking tips for perfect results
Skillet Selection
Use a 10-12 inch oven-safe skillet with sloped sides—I recommend a Calphalon Classic or All-Clad Stainless Steel for even heat distribution. The sloped sides help prevent filling spillage when you transfer it to the oven. Avoid non-stick skillets for this recipe; they can't handle the high oven temperatures without warping.
A cast iron skillet works too, but preheat it in the oven for 10 minutes at 375°F to prevent cracking. 🔥
Preventing a Soggy Crust
Here’s my foolproof trick: After assembling the pie, sprinkle ¼ cup coarse breadcrumbs or crushed Ritz crackers on top of the crust before baking. This creates a barrier that absorbs excess moisture, keeping the crust crisp.
Another pro move is to bake the crust unfilled for 5 minutes before adding the filling—this pre-bakes the bottom and prevents a soggy base. 💡
Timing the Chicken
Cook the chicken in two batches if your skillet is crowded—overcrowding steams the meat instead of browning it. I use a meat thermometer to check doneness at 165°F internal temperature.
If the chicken is still slightly undercooked after 6 minutes, cover the skillet and cook for another 2-3 minutes off the heat. This ensures juicy, fully cooked chicken without drying it out.
Gravy Thickening Hacks
If your gravy turns out too thin, mix 1 tablespoon cornstarch with 1 tablespoon cold water and stir it in at the end. For extra richness, replace ¼ cup of the chicken broth with white wine or chicken stock.
The key is to simmer the gravy for 3-4 minutes after adding the flour—this cooks out the raw flour taste completely. 🥄
Crust Venting Secrets
Cut 4-5 small slits in the crust center, but also make tiny slits along the edges—this allows steam to escape evenly and prevents a puffy, uneven top. For an extra-crispy finish, brush the crust with melted butter after the egg wash.
I also like to sprinkle ½ teaspoon smoked paprika on top before baking for a subtle smoky flavor. 🌟
Resting Like a Pro
Let the pot pie rest for 10-15 minutes before serving—this lets the filling set and the crust firm up slightly. If you’re short on time, place the hot skillet on a wire cooling rack instead of a plate to prevent sogginess.
For serving, I recommend using a pie server or large spoon to scoop out portions—this keeps the crust intact and makes plating easier. 🍽️
Nutrition facts
Frequently asked questions
Can I make this pot pie with a different type of crust?
While the recipe uses Pillsbury Classic Pie Crust for convenience, you can substitute with homemade pie dough or even puff pastry. For a gluten-free option, use a pre-made gluten-free pie crust or line the skillet with parchment paper before adding your crust. Just ensure your alternative crust is about 1/8-inch thick for even baking.
How do I prevent the crust from getting soggy?
Use this trick: Sprinkle ¼ cup crushed Ritz crackers or breadcrumbs on top of the crust before baking. This creates a moisture barrier that keeps the crust crisp. Another method is to pre-bake the crust (unfilled) for 5 minutes at 375°F before adding your filling. Always cut 4-5 small slits in the center to allow steam to escape.
Can I prepare this pot pie ahead of time?
Yes! Assemble the pie completely (without baking) and refrigerate for up to 24 hours before baking. For make-ahead baking, cover with foil and bake from cold. The filling will taste even more developed after chilling. Store leftovers in an airtight container for 3-4 days—the crust stays crispy when properly stored.
What if my gravy turns out too thin?
Mix 1 tablespoon cornstarch with 1 tablespoon cold water and stir it into the gravy at the end. Simmer for 1-2 minutes until thickened. For extra richness, replace ¼ cup chicken broth with white wine or add 1 tablespoon butter at the end. Always simmer the gravy for 3-4 minutes after adding flour to eliminate raw flour taste.
Can I use frozen vegetables in this recipe?
Frozen vegetables work perfectly! Just thaw them completely before adding to the skillet. I recommend using fresh or frozen peas and frozen mixed vegetables (like corn or green beans) for convenience. For best texture, thaw in the refrigerator overnight or use the microwave's defrost setting. Avoid adding frozen veggies directly to the hot skillet—they'll release too much moisture.