
Main Courses
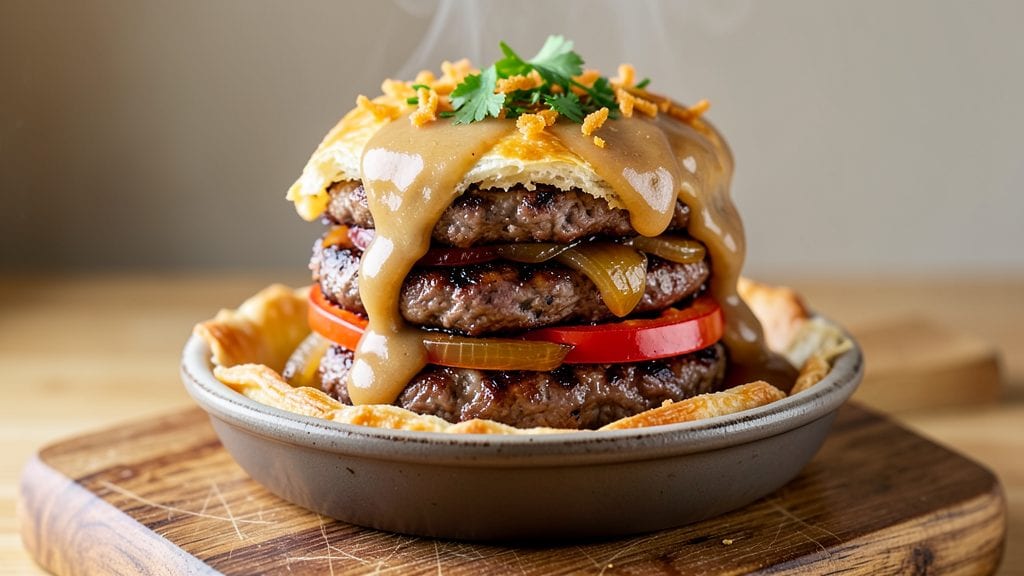
This burger pies recipe transforms a classic comfort food into handheld golden bites that combine the best of burgers and pies—juicy beef filling wrapped in a flaky pastry crust that shatters at every bite.
After years of perfecting the balance between tender filling and crispy pastry, I’ve developed a method that delivers restaurant-quality results at home with simple techniques. The secret lies in browning the beef properly and using a high-fat pie crust that stays crisp even after baking.
What sets these burger pies apart is the rich, savory filling—ground beef seasoned with classic burger spices, melted cheese, and optional vegetables like onions or bell peppers for texture.
The pastry dough is rolled out thin and layered carefully to ensure a golden, crispy exterior while keeping the filling warm and gooey inside. This recipe serves as both a hearty main dish and a crowd-pleasing appetizer, depending on the size of your pies.
The result is a dish that’s impossible to resist—flaky, buttery crust giving way to juicy beef and melted cheese in every bite. Whether you’re serving them as a cozy weeknight dinner or a showstopper for game day, these pies are designed to impress without requiring advanced skills.
The best part? They reheat beautifully, making them perfect for meal prep or leftovers.
For extra versatility, consider making mini pies for appetizers or stuffing the filling into burger buns for a deconstructed twist. Pair with tangy pickles, crisp coleslaw, or a side of fries for the ultimate burger pie experience. Let’s get started on creating these handheld masterpieces!
Ingredients for burger pies
Juicy beef, melty cheese, and flaky crust—just 13 ingredients for handheld perfection.
| Ingredient | Amount | Notes |
|---|---|---|
| Ground Beef 🥩 | 1 ½ lb | 80/20 fat ratio preferred |
| Yellow Onion 🧅 | 1 medium | diced fine |
| Red Bell Pepper 🍆 | 1 medium | diced fine |
| All-Purpose Flour 🌾 | 2 cups | plus 1 tbsp for rolling |
| Unsalted Butter 🧈 | ¾ cup | cold, cubed |
| Ice Water 💧 | ½ cup | for dough |
| Shredded Cheddar Cheese 🧀 | 1 ½ cups | sharp cheddar preferred |
| Kosher Salt 🧂 | 1 ½ tsp | plus extra for seasoning |
| Ground Black Pepper 🌶️ | 1 tsp | freshly ground |
| Garlic Powder 🧄 | 1 tsp | or 2 cloves fresh minced |
| Onion Powder 🧅 | 1 tsp | for extra flavor |
| Worcestershire Sauce 🍶 | 1 tbsp | for depth of flavor |
| Egg 🥚 | 1 large | for egg wash |
The beef is everything. 80/20 fat ratio keeps it juicy—don't skimp on the fat! Grab ground beef from the butcher counter if your store has it, or check the Costco bulk section for the best price. The onions and bell peppers should be fresh and crisp, not wilted. Dice them fine so they melt into the filling instead of staying chunky. For the dough, King Arthur flour or Bread Sifter's All-Purpose gives the best texture, but any good all-purpose will work. Keep the butter cold—this is key for flaky layers!
No red bell pepper? Green works too, or swap for an extra 1/2 cup diced onion. Short on cheddar? Monterey Jack or pepper jack add great flavor—just use the same amount. Running low on Worcestershire? 1 tsp soy sauce plus 1/2 tsp vinegar mimics it pretty well. The dough gets tricky if it's too warm—chill it 30 minutes before rolling if your kitchen's hot. For extra richness, add 1 tbsp sour cream to the filling. Trust me, it makes a difference!
These pies reheat like a dream—350°F for 15-20 minutes until golden. Store leftovers in an airtight container for 3 days, or freeze for 2 months. I always make mini versions for parties—they disappear fast! For meal prep, freeze unbaked pies on a tray, then transfer to a bag. Bake straight from frozen, adding 5-7 minutes to cook time. The cheese gets extra gooey when reheated, so don't skip that step!
Why You'll Love This Recipe
- One-Pan Magic: I swear by this recipe when I’m too tired to scrub a million dishes. Brown the beef and veggies in the same skillet, then pour in the flour-butter slurry—no extra bowls, no extra mess. Just a single pan that does all the work while you wipe crumbs off the counter.
- Crispy-Creamy Contrast: That golden crust on top? Chef’s kiss. The buttery flour crust meets the juicy, savory beef filling—like a hug for your taste buds. Honestly, the first time I bit into one still warm, I nearly dropped the whole pie.
- Leftovers That Save Me: Between us, these pies reheat like a dream. Slice a few for lunch the next day, or freeze half for when you’re too wiped to cook. The crust stays crispy even after reheating (microwave hack: cover with a damp paper towel).
- Budget-Friendly Feast: Ground beef, onions, and bell peppers stretch into a meal that feeds four for less than $10. No fancy ingredients, no waste—just solid, satisfying comfort food that won’t break the bank. My college-self would’ve cried.
Step-by-step instructions for flaky pastry hugging juicy beef and cheese
Here's how to build these incredible handheld burgers with a crisp, golden crust and melt-in-your-mouth filling.
Prepare the Juicy Beef Filling
In a large skillet over medium-high heat, crumble the 1.5 lb ground beef and cook until browned, breaking it apart with a wooden spoon. This should take about 5-7 minutes. The beef should be fully cooked through with no pink remaining.
Add the diced fine yellow onion and diced fine red bell pepper to the skillet. Cook for another 3-4 minutes until the vegetables soften slightly. Stir in the 1 tbsp Worcestershire sauce, 1.5 tsp kosher salt, 1 tsp ground black pepper, 1 tsp garlic powder, and 1 tsp onion powder. Cook for another 2 minutes until everything is well combined and the flavors meld together.
Remove the skillet from heat and let the mixture cool slightly. Then, stir in the 1.5 cups shredded cheddar cheese until fully melted and creamy. This step ensures every bite of your burger pie will be packed with rich, gooey cheese and flavorful beef.
Make the Flaky Pastry Dough
In a large mixing bowl, combine the 2 cups all-purpose flour with an additional 1 tbsp flour for rolling. Cut the 0.75 cup unsalted butter into small cubes and add them to the flour mixture. Use a pastry cutter or your fingers to work the butter into the flour until the mixture resembles coarse crumbs with some pea-sized butter pieces remaining.
Drizzle the 0.5 cup ice water over the flour-butter mixture while stirring gently with a fork. Add just enough water to bring the dough together—it should hold when pressed but still feel slightly crumbly. If it's too dry, add a splash more water; if too sticky, add a bit more flour. Form the dough into a disk, wrap it in plastic wrap, and refrigerate for 30 minutes.
Assemble the Pies
Preheat your oven to 375°F. Roll out the chilled dough on a lightly floured surface to about 1/8-inch thickness. Cut circles using a 4-inch round cutter (or a glass of that size) to make the pie crusts. You should get about 4 crusts from this dough.
Place a generous spoonful of the beef filling into the center of each crust. Fold the crust over the filling, pressing the edges together to seal completely. Brush the tops with the beaten 1 large egg for a golden finish. Place the assembled pies on a baking sheet lined with parchment paper.
Bake to Golden Perfection
Bake the pies in the preheated oven for 20-25 minutes until the crusts are golden brown and the filling is bubbling through the slits. The pies are done when they look beautifully crisp and the cheese is fully melted.
Let the pies cool for 5 minutes before serving to allow the filling to set slightly. The result should be a flaky, buttery crust hugging a juicy, cheesy beef filling that melts in your mouth. Serve warm with your favorite toppings or as-is for a satisfying handheld meal.
Pro Tips For Making Burger Pies
- Cook beef on medium-high: I learned this the hard way—low heat makes burger pies greasy and uneven. Get that beef sizzling fast, then stir often to break it up into small, even crumbles. The goal is a dry, flavorful base, not a stew.
- Sweat onions first: Skip the raw onion chunks in the beef—it burns and makes the pie bitter. Sauté finely diced yellow onion in butter until translucent (about 5 minutes) before adding the beef. This builds flavor without overpowering the meat.
- Prep bell pepper like an adult: I used to dice bell peppers unevenly, and they’d turn mushy. Cut them into tiny, uniform cubes (about ¼-inch) so they cook fast and stay crisp. A sharp knife makes this faster—don’t be lazy.
- Use cold butter for crust: Melted butter in the flour mix makes a flat, sad crust. Cut chilled butter into tiny cubes and toss it into the flour with your fingers—this creates flaky layers. Cold butter = golden, crispy pie crust.
Pro cooking tips for this dish
Browning Beef Perfectly
Never skip browning the beef—this step builds deep, meaty flavor through the Maillard reaction. Use a cast-iron skillet for even heat distribution and break the beef into small chunks with a wooden spoon.
Cook until it reaches 165°F internally—this ensures juiciness. I like to add a pinch of smoked paprika during browning for extra depth. 🔥
Dough Temperature Matters
The key to flaky crust lies in keeping everything cold. Work quickly with cold butter and chill the dough for at least 30 minutes before rolling. If your kitchen is warm, pop the dough in the fridge for an extra 15 minutes.
Use a rolling pin with a marble base—it stays cooler longer than wood or plastic. Never overwork the dough or it’ll get tough.
Sealing the Crust Tightly
Properly sealing the edges prevents filling leaks and ensures a clean bite. Press the crust edges together firmly with your fingers or a fork, then crimp them with a pastry wheel for extra security.
For mini pies, use a 3-inch cutter—they’re easier to handle and bake faster. Brush the sealed edges with egg wash before baking for extra crispiness.
Baking Time Adjustments
Watch your pies closely after 15 minutes—they’re done when the crust turns golden brown and the filling starts bubbling. If they brown too quickly, tent with foil to prevent burning.
For extra crispiness, broil for 1-2 minutes at the end. I always bake on the middle rack for even heat distribution. 💫
Resting Before Serving
Let pies rest for 5-10 minutes after baking—this allows the filling to set slightly and prevents cheese from oozing out. Serve immediately for maximum crispness, but they’ll stay good for 2 hours at room temperature. Store leftovers in an airtight container with parchment paper between layers to maintain texture.
Mini vs. Standard Size
For mini pies (about 2-inch diameter), reduce baking time to 12-15 minutes. They’re perfect for appetizers and disappear fast at parties. For standard 4-inch pies, stick to the 20-25 minute guideline. Pro tip: Use a cookie scoop for even filling portions—this ensures uniform baking and presentation. 💡
Nutrition facts
Frequently asked questions
Can I make these without a pie crust?
For a quick version, use puff pastry sheets or phyllo dough—both wrap beautifully around the filling. Preheat your oven to 375°F, layer the dough around the filling, and bake for 15-18 minutes until golden. For a no-pastry option, try forming the filling into patties and baking them in a skillet with a crispy panko-crusted top.
How do I keep the crust from getting soggy?
Prevent soggy bottoms by baking the filling uncovered for 5 minutes first to remove excess moisture. Brush the crust with egg wash before baking, and place pies on a baking sheet lined with parchment paper. For extra insurance, chill the assembled pies for 15 minutes before baking—this helps the crust set up better.
What’s the best way to reheat leftover burger pies?
Reheat in a 350°F oven for 10-15 minutes until the crust is crispy again. For a quick fix, use a toaster oven or air fryer at 375°F for 5-7 minutes. Avoid microwaving—it turns the crust rubbery. Store leftovers in an airtight container with parchment paper between layers to keep them fresh.
Can I make these ahead of time?
Yes! Assemble the pies and refrigerate them for up to 24 hours before baking. For extra-long storage, freeze unbaked pies on a tray, then transfer to a bag. Bake straight from frozen, adding 5-7 extra minutes to cook time. Thaw overnight in the fridge if possible for best results.
What’s a good topping for these?
Classic choices include sliced dill pickles, crispy bacon bits, or a dollop of spicy mayo. For a tangy kick, try a drizzle of sriracha aioli. Skip heavy toppings like sauerkraut—they can make the crust soggy. Serve with a side of crispy fries or a simple coleslaw for balance.