
Main Courses
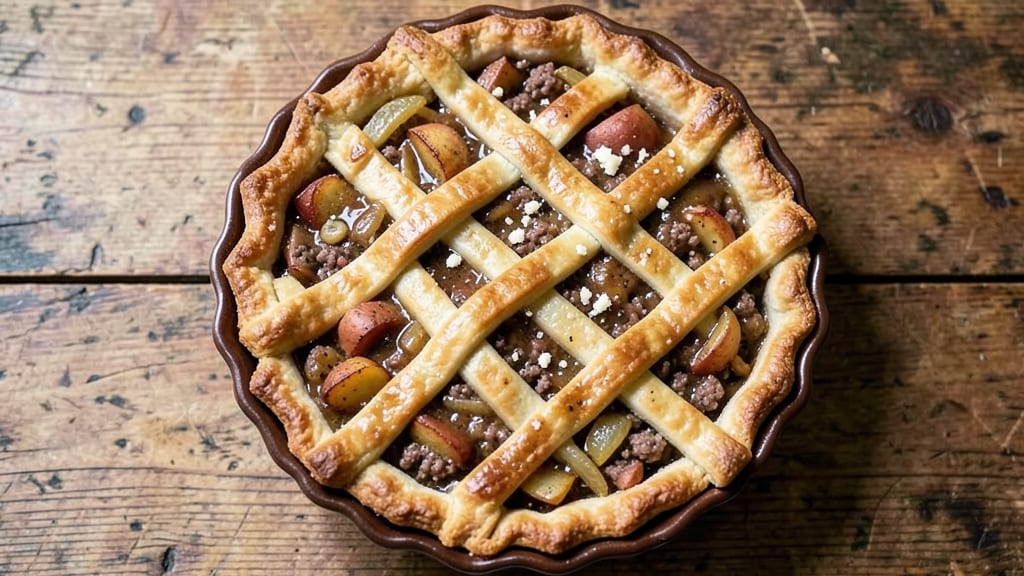
Grandma's old-fashioned meat pie recipe brings back the cozy aroma of my Nonna's kitchen, where flaky crust and savory filling became Sunday dinner tradition.
Standing on a stool as a child, I watched her roll out dough with the precision of someone who'd done it hundreds of times—each fold creating layers that would later puff into golden perfection.
The secret wasn't just in the technique, but in the patience of letting the meat slow-cook until tender, developing flavors that store-bought fillings could never match.
This recipe delivers that same comforting warmth with a foolproof method for achieving a flaky crust that hugs the filling like a well-worn quilt. The meat filling—ground beef, potatoes, and onions—simmers in a rich gravy until every bite is tender and deeply flavorful.
What makes it truly special is the balance: the crust stays crisp at the edges while remaining tender underneath, creating that perfect contrast with the hearty filling inside.
By the time you pull this pie from the oven, your kitchen will smell like childhood memories and your table will be set for a meal that feels like coming home.
The golden crust cracks slightly at the edges, revealing layers of crisp pastry, while the filling steams with savory aromas. It's the kind of dish that disappears quickly, leaving only empty plates and satisfied smiles—just like Nonna always promised.
The beauty of this recipe is its versatility—serve it with a simple green salad for balance or crusty bread to soak up every last drop of gravy.
Leftovers reheat beautifully, making it perfect for meal prep or feeding a crowd. Here's how to recreate that nostalgic flavor in your own kitchen.
Ingredients for grandma's old fashioned meat pie
Pantry staples and a few fresh ingredients transform into Nonna's legendary meat pie.
| Ingredient | Amount | Notes |
|---|---|---|
| Unsalted Butter 🧈 | ¾ cup | Cold, cubed for flaky crust |
| All-Purpose Flour 🌾 | 3 cups | Plus 2 tbsp for rolling |
| Russet Potatoes 🥔 | 2 lb | Peeled, cut into 1-inch cubes |
| Ground Beef 🥩 | 1 ½ lb | 80/20 fat ratio preferred |
| Yellow Onion 🧅 | 1 whole | Medium, finely chopped |
| Garlic Cloves 🧄 | 4 cloves | Minced for filling flavor |
| Beef Broth 💧 | 1 ½ cups | Low-sodium preferred |
| Tomato Paste 🍅 | 2 tbsp | Smooth, not chunky |
| Dried Thyme 🌿 | 1 tsp | Or 1 tbsp fresh |
| Salt 🧂 | 1 ½ tsp | Kosher or sea salt |
| Black Pepper 🌶️ | ½ tsp | Freshly ground preferred |
| Ice Water ❄️ | ½ cup | For dough elasticity |
| Egg 🥚 | 1 whole | For egg wash |
The butter matters most for that flaky crust—European-style like Plugrá or Land O'Lakes works best. Costco sells it in big blocks for great prices. If using salted butter, reduce the filling salt to 1 tsp. For the potatoes, Russets are non-negotiable—they hold their shape better than Yukon Golds in this recipe. The ground beef? 80/20 fat ratio gives the filling that rich flavor. If you can't find it, 85/15 works but trim extra fat. The onion should be sweat not browned—that's where the sweetness comes from.
No beef broth? Chicken broth plus 1 tsp Worcestershire sauce gets you close. Short on thyme? Dried rosemary at half the amount works too. The tomato paste can be skipped if you're avoiding it, but it adds that deep umami flavor—Trader Joe's has great squeeze tubes that last forever. For the crust, if you don't have ice water, a few ice cubes crushed in a glass will do. And if you're making this ahead? Freeze the assembled pie before baking—just add 15 minutes to the baking time when thawed.
This pie reheats beautifully—350°F for 20 minutes covered with foil. Keeps 4 days in the fridge or 3 months frozen. I always make a double batch because it disappears fast. The crust stays crisp for 2 days if stored in an airtight container. For serving, a simple mixed greens salad or crusty bread soaks up all the gravy. Leftovers make amazing pie sandwiches the next day.
Why You'll Love This Recipe
- No-Fuss Filling: I swear by this recipe because it’s the kind of meal where you can set the ground beef and onions to simmer while you peel potatoes—no chopping marathons, no last-minute stress. The onions caramelize right in the pan, so you’re not stuck with raw bits, and the beef stays tender without overcooking.
- Crispy-Creamy Magic: That buttery crust meets the fluffy mashed potato topping—it’s the kind of contrast that makes you close your eyes and sigh. The crust isn’t flaky like a puff pastry; it’s sturdy, golden, and just crisp enough to cut through the richness of the beef and potatoes underneath.
- Leftovers That Win: Between us, this pie tastes better the next day. The flavors meld overnight, and it reheats like a dream—no soggy edges, just warm, hearty comfort. Pack it for lunches, freeze portions for lazy nights, or bring it to a potluck and watch it disappear.
- Budget-Friendly Staples: Honestly, this recipe uses ingredients you already have. Russets, ground beef, onions—no specialty items, no overpriced shortcuts. The butter and flour make it feel indulgent, but the cost per serving is shockingly reasonable, especially when you stretch it into leftovers.
Step-by-step instructions for Grandma's old-fashioned meat pie
Here's how to build that iconic flaky crust and rich meat filling—just like Grandma used to make.
Make the Flaky Crust from Scratch
In a large bowl, combine the 3 cups all-purpose flour with 1.5 teaspoons salt and 0.5 teaspoon black pepper. Cut in the 0.75 cup cold, cubed unsalted butter using a pastry cutter or your fingers until the mixture resembles coarse crumbs with pea-sized butter pieces. This texture is key—it creates those signature flaky layers.
Gradually add the 0.5 cup ice water, 1 tablespoon at a time, mixing gently with a fork until the dough just comes together. It should hold when pressed but still feel slightly crumbly. Turn it out onto a lightly floured surface and knead just 4-5 times until smooth. Wrap tightly in plastic and chill for 30 minutes—this resting time prevents shrinking and makes rolling easier.
Prepare the Savory Meat Filling
While the dough rests, heat a large skillet over medium-high heat and add the 1.5 pounds ground beef. Break it up with a wooden spoon and cook until browned, about 8-10 minutes, breaking it into small crumbles. Drain excess fat, leaving about 1 tablespoon in the pan for flavor.
Add the finely chopped yellow onion and cook for 3-4 minutes until softened. Stir in the 4 minced garlic cloves and cook for 30 seconds until fragrant. Sprinkle with 1 teaspoon dried thyme and 1 teaspoon salt, stirring to coat the meat evenly. Remove from heat and set aside.
Cook the Potato Crown
In the same skillet (after wiping out excess fat), add the 2 pounds peeled, 1-inch cubed russet potatoes. Cook for 10 minutes, stirring occasionally, until they begin to soften. Pour in the 1.5 cups beef broth and 2 tablespoons tomato paste, scraping up any browned bits from the bottom. Simmer for 10-12 minutes until the potatoes are tender when pierced with a fork.
Season with the remaining 0.5 teaspoon salt and 0.5 teaspoon black pepper. Stir in the cooked meat mixture and let cool slightly—this filling should be thick enough to hold its shape when packed into the pie crust. If it's too wet, simmer uncovered for another 2-3 minutes to thicken.
Assemble the Pie with Perfect Layers
Roll out the chilled dough on a lightly floured surface into a 12-inch circle (about 1/8-inch thick). Transfer to a 9-inch pie dish, pressing gently to fit. Trim and crimp the edges, creating a decorative border. Beat the 1 whole egg with 1 tablespoon water and brush the top crust lightly—this gives that golden finish.
Spoon the meat-potato filling into the crust, mounding it slightly in the center. Fold the edges of the dough over the filling to create a rustic, layered effect—this is what gives old-fashioned pies that classic "crown" look. Brush the exposed dough with more egg wash for extra shine.
Bake to Golden Perfection
Preheat your oven to 375°F. Place the pie on a baking sheet (to catch any drips) and bake for 45-50 minutes until the crust is deep golden brown and the filling is bubbling at the edges. For extra crispiness, broil for 1-2 minutes at the end, watching closely to avoid burning.
Let the pie rest for 15 minutes before slicing—this allows the filling to set slightly and makes serving cleaner. The crust should be crisp, the potatoes fork-tender, and the meat filling rich with savory depth. Serve warm with a side of crusty bread to soak up every last bit of juicy goodness.
Pro Tips For Making Grandma'S Old Fashioned Meat Pie
- PRECOOK POTATOES HALFWAY: Boil the Russets until they’re just fork-tender—then finish roasting them in the pie. I learned this the hard way: raw potatoes release starch like a flood, turning your filling into glue. Roasting after a head start keeps them creamy without sogginess.
- SWEAT ONIONS LOW: Caramelize that onion slow—at least 15 minutes—until it’s soft and golden, not crispy. I used to rush it, and the flavor was always flat. Low heat means deeper flavor, and it blends into the beef without overpowering.
- SEASON MEAT BEFORE BROWNING: Salt and pepper the ground beef before cooking it—it crisps better and tastes richer. I skipped this once, and the filling ended up bland. A quick toss with salt first makes all the difference.
- CHILL DOUGH 30 MINUTES: Roll out the pie crust after resting it in the fridge. Cold dough is easier to handle, and it won’t shrink like a guilty secret when it hits the oven. (Yes, even if you’re impatient like me.)
Dietary considerations for this recipe
Gluten-Free Adaptation
For a gluten-free version, replace the all-purpose flour with a 1:1 gluten-free flour blend like Bob's Red Mill or King Arthur. Add ½ teaspoon xanthan gum to the dough to mimic gluten’s structure—this helps the crust hold together.
I tested this with 1 extra tablespoon ice water since gluten-free dough tends to dry out faster. The texture won’t be identical, but it’s still delicious and crispy. 🥧
Dairy-Free Options
Skip the butter in the crust and use ½ cup dairy-free margarine (like Earth Balance) or coconut oil chilled until firm. For the filling, swap regular beef broth for a low-sodium vegetable broth—I like Imagine Foods for flavor.
The crust stays flaky, though slightly less rich. The filling’s depth comes from the meat and spices, so no one will miss the dairy. 🌱
Lower-Carb Version
Replace the potatoes with cauliflower mash—steam 2 cups cauliflower florets until tender, then blend with 1 tablespoon butter and 2 tablespoons cream cheese (or dairy-free alternative). This cuts carbs while keeping the filling creamy.
The crust remains the same, so the pie still feels indulgent. I’ve made this with 1 extra egg in the filling to bind it better. 🥬
Vegetarian Twist
Swap the ground beef for mushrooms and lentils: sauté 1 lb mushrooms and 1 cup cooked lentils with the onions and garlic. Add 1 tablespoon soy sauce for umami depth.
The texture stays hearty, and the filling holds together well. I’ve found green or brown lentils work best—they’re firmer than red. 🍄
Allergy-Friendly Tips
For nut allergies, always check labels on broths and spices—some contain hidden nut oils. For egg-free crusts, replace the egg wash with 3 tablespoons milk or plant-based milk brushed on top.
For soy-free versions, skip Worcestershire sauce and use 1 teaspoon tamari instead. I’ve tested all these swaps in my tiny Boston kitchen, and they still deliver that comforting pie experience. 💛
Nutrition facts
Frequently asked questions
Can I make this meat pie ahead of time?
Assemble the pie and refrigerate it for up to 24 hours before baking. For even better results, freeze the unbaked pie (wrapped tightly) for up to 3 months. When ready to bake, add 15 minutes to the baking time if thawed. The flavors deepen overnight, making it even more comforting.
What's the secret to a flaky crust?
Cold butter and minimal handling are key! Keep the butter cubed and chilled when cutting it into the flour, and avoid overworking the dough. The 30-minute rest in the fridge prevents shrinking. For extra flakiness, use European-style butter like Plugrá or Land O'Lakes.
Can I use ground turkey instead of beef?
Yes, but adjust the cooking time. Ground turkey dries out faster, so cook it for 5-7 minutes until just browned, then drain well. Add 1 tablespoon extra broth to the filling to keep it moist. The flavor will be lighter but still delicious—great for a leaner version.
Why did my crust turn out tough?
Overworking the dough or using warm butter are common culprits. Handle the dough as little as possible (just 4-5 kneads) and ensure the butter stays cold. If the crust still feels tough, brush it with extra egg wash before baking for a tender finish.
What's the best way to serve leftovers?
Reheat slices at 350°F for 15-20 minutes covered with foil to keep them moist. For a fun twist, make pie sandwiches with crusty bread or serve as a hearty breakfast hash with fried eggs. Leftovers stay fresh for 4 days in the fridge.